All posts by dstenger

Building the Cranberry and Linville River Railroad – A Journey, Pt. 3

Many a Good Plan Goes Astray

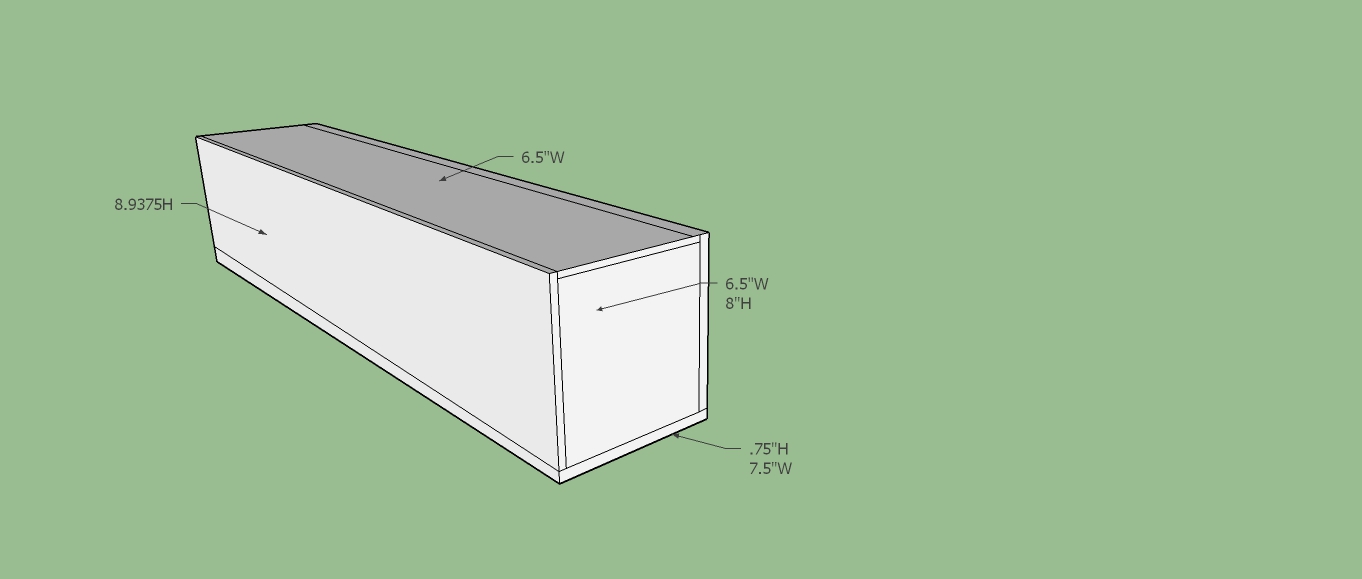
With plan in hand I began to make the roadbed. Having a GCGRS rail-raising at the home of the Griffin’s I was familiar with making roadbed with the 2X6 pressure treated lumber. While attending the Columbus Garden Railway Association’s annual layout tour I discovered an alternative to using the 2X6 method using a two splines joined by wooden spacers ever foot or so to create roadbed. Using this method the spline was bent to the appropriate radius and then screwed together to lock the radius in place. The roadbed is then mounted to stakes to level the track or create grades and then filled with ballast and dirt before laying the track. I completed one loop of the two using this method, but while I liked the appearance more than the 2X6 it was very difficult to get the desired radius and was not as durable so the second loop was the tried and true 2X6 method. The 2X6 method consists of pressure treated lumber joined by a 10” gusset plate. Curves are created by cutting the 2X6 at the appropriate length and angle for each radius. The templates are available for download at http://gcgrs.org/wp-content/uploads/2020/05/Garden-Railway-Roadbed-Dimensions.pdf This method creates a strong and durable roadbed. Railroads using this method have been in place since the 1990s are still in good shape. Some warping does occur. However, the track can be shimmed to compensate. In our area, the roadbed can “pop” out of the ground during freeze and thaw, but the roadbed rises as one piece and settles back nicely in the spring. With track laid on both loops the trains were running…well sort of. I used the Aristocraft rail joiners but did not use any conductive paste. After the first winter quite a few of the rail joiners failed and I had numerous conductivity issues. Our current railroad was build with LGB joiners with conductive paste and 14 gauge solid wire jumpers. (Since then we have switched to battery power but maintain track power for visitors using rail clamps where needed.)

Don’t Let the Rain Come Down… 

The first garden railway was built in the backyard of our yard behind our bi-level house. Since our house was a bi-level, our garage was in the basement and our driveway had about a four – five foot rise to the street from the garage floor. We began to notice that during heavy rains, the drain in the driveway would back up. After the city repaved the street eliminating most of the curb in front of our house more and more rain would come down our driveway to the point where the drain could not handle the rain and it began to backup into our garage and then into our house. After a couple of wet basements we called RotoRooter to determine why our drain wasn’t up to snuff. The “gator-cam” revealed two areas in the drain tile had collapsed requiring replacement of the drain tile back to the storm drain. The builder used the corrugated plastic drain tile instead of spending a couple more bucks for the PVC. $2600 later we had a patch in our driveway, a new pipe and a ditch going back to the back yard. While the Rotorooter guys were there I asked them to dig my pond. Even with the new pipe every time it rained we worried. The city wouldn’t do anything about the drainage issue. We decided to move to higher and drier ground. So up came the track, and the wood went into the trash. I rented a tiller and leveled everything out and planted new grass.

Moving On Up!

 After looking at one house, we decided we wanted to build instead of buying an existing house. After looking around Walton and other areas, we settled on a lot in the Richwood area in Heritage Trails. Heritage Trails was started in the late 70s and actually was one of the first Homefest sites. There were several what we call Brady Bunch houses. In the 80s, the subdivision extended and then again in the 90s. We built our house and moved in 1999. Meanwhile, the Greater Cincinnati Garden Railway Society bid and was awarded the 2005 National Garden Railway Convention. That would give me two years to make plans and get the yard ready to begin construction in 2001 giving me 4 years to get the railroad ready for the convention.

The Best Laid Plans of Mice and Men

It seems that the Long Island Garden Railway Club was planning to host the 2002 garden railway convention until they found out the accommodations could not be provided at a reasonable cost (rumor has it that organized crime was involved, but I’m not saying so). They approached the GCGRS to see if we could step in and host the 2002 convention instead of in 2005. Uh-oh, now instead of two years to get ready and 4 years to build my new railroad I had one year to get ready and only two years to build. YIKES! Time to get busy.

Building the Cranberry and Linville River Railroad – A Journey, Pt. 2

What is a Garden Railway, Anyway?

In the summer of 1995 we took a weekend trip to ride behind L&N 152 at the Kentucky Railroad Museum in New Haven, Kentucky and visit Mammoth Cave National Park in Mammoth Cave, Kentucky. As we exited the interstate on our way home we observed a listing on the marquee of the Drawbridge Motor Inn and Convention Center located near our home at the time for the 11th National Garden Railway Convention Public Day. We had no idea what a garden railway was at the time, but “railway” had to mean trains so we decided to attend.

We paid five dollars a piece, were given a convention program and entered the dealer hall. I was so excited I was beside myself. I could combine trains with another interest of mine, gardening and the size of the trains was amazing. But seeing my first garden railroad “closed the deal.” Several of the garden railroads were open. We picked two railroads close by to visit, Ray and Ruth Faragher’s and John and Martha Lange’s Clear Creek District.

DSCN4421smThe Lange’s Clear Creek District was our first garden railroad and I immediately decided this was for me! The next year I joined the Greater Cincinnati Garden Railway Society and began attending meetings. Coincidentally, the first meeting I attended was at the Lange’s. At this point I was starting to read and study and plot.

Our First Large Scale Train

A few months later I was at the dentist reading a train magazine as usual when my dentist mentioned his son had a train set he was no longer using and wanted to know if I was interested. I inquired as to the scale and when I found out it was large scale, I quickly arranged the sale. m_fKIDA7RcMCM0PsZG5fR4AFor $35 I now owned a Bachmann Big Haulers Thunderbolt Express G Scale Electric Train Set (including a ten-wheeler, gondola, and bobber caboose, as well as a circle of track and transformer) and a Bachmann tank car assembled from a kit. Soon the train was home chasing itself around the small circle of track that came with the set. The tank car was painted a garish red white and blue. The other cars were out of the box. As my wife, Pam and I were watching the train circle the track, she mentioned we need a bigger loop. What did my ears hear? More track? Soon we were planning a 6 X 16 foot loop of track in a bed off the side of our patio. With a few plants and a load of dirt we had our first garden railway and I was plotting a bigger railway along the north side of our fenced backyard. When I showed Pam my plan her reaction was a bit of shock. There just wasn’t enough room on the north side, why not build a larger railway expanding on our current site and the south side of our backyard. It didn’t take any arm twisting to get me to agree. The planning was underway again for larger railway consisting two loops, a pond, trestles, and bridges, but there was a biting question…what to model? Freelance? Prototype? Once thing was certain, I wanted a narrow gauge steam powered railroad, no smelly diseasels for me! Since a majority of narrow gauge railways are based on western railroad, having visited Colorado I can see why, I was set on narrow gauge in the east. After all, Kentucky alone had several narrow gauge railways. After lots of pondering I settled on a freelanced railroad, the Kentucky and Northern (a twist on Northern Kentucky were we live). tanker

The poorly painted tank car was repainted black and a simple K&N adorned the side of the tank. The K&N now had its first car and a new water tank built from the Piko water tank kit I got as a Christmas present.

water towerWith a track plan in hand we were off to Indianapolis for a weekend trip to visit the Indianapolis Children’s Museum, the Indiana Transportation Museum, and a visit to Watt’s Train Shop to buy track. We thoroughly enjoyed our visit to the Children’s Museum. I especially appreciated their fine train collection, viewing the Rueben Wells, a 0-10-0T locomotive built to conquer the 5.89 percent grade out of Madison, Indiana. Unfortunately, we visited before Paul Busse and Applied Imagination worked their magic recreating Madison, Indiana including Larry Koehl’s scratchbuilt model of the Rueben Wells in G Scale. Our trip to the Indiana Transportation Museum included a ride from Noblesville to Atlanta, Indiana on their lovely Monon train powered by their F units and their fleet of Budd stainless steel passenger cars. Finally we were on our way to Zionsville less than an hour north of Indianapolis. We spent over an hour visiting the store purchasing Aristocraft track and LGB switches for the K&N. With Indianapolis behind us we were on our way home to start our new garden railway.

Building the Cranberry and Linville River Railroad – A Journey, Pt. 1

Introduction

As Mark Horovitz, founder and former editor of Garden Railways once wrote, our railroad is a journey rather than a destination.

The Journey Begins

The journey began over 30 years or so when I received my first train, the ubiquitous Lionel 027 starter set. LIONEL_TRAIN_027_COLLECTION_11311_SET_BOXLike any other young boy, I ran and ran my Lionel Atlantic locomotive around and around the oval of three-rail track pulling three red flatcars and a Lionel caboose. I can only imagine how much my parents paid for my train, but it must have been dear considering our economic status at the time. After a while the trains were stored away in the box as my interest turned to learning to play the piano and trombone, frogs, toads, model airplanes and rockets. In high school I found trains again. One of my best friends had a Santa Fe based HO layout in his garage and the bug was back. I sold my Lionel stuff (a decision I regret to this day) to buy HO and was soon spending my allowance on HO locos, cars, track, etc. and in a short time had a 4X8 Louisville and Nashville inspired layout. When high school ended the layout came down as college again took me away from model trains.

There were brief encounters with trains. I have pictures of my wife, Pam (then girlfriend) and me when N&W’s 611 came to town. Monday, February 23, 2004 (4)One day before we were married, Pam and I were sitting in my parents’ living room in Covington, Kentucky watching TV when I heard a steam whistle. Before she knew what had hit her, we were speeding through Latonia chasing a steam excursion running down the L&N main line.Monday, February 23, 2004 (7) At that point she learned that my love of trains was not extinguished, but smoldering deep below, like a volcano, just waiting for its day to erupt.

Other than that brief train-chasing incident, the volcano lay quiet until that fateful day in January of 1994 when we just happened to go to Johnny’s Toys to visit the birthday castle for my son, Zach, who had just turned two. Those of you not from the Cincinnati area and not familiar with the birthday castle, each year, Johnny’s Toys sent out a key to children for a free toy from the castle. It is a tradition that was place as long as I can remember in my 50+ years. Unfortunately, Johnny’s Toys has closed.downloadAs fate would have it, the weekend we made our yearly visit was the weekend of the annual train show at Johnny’s. Both the Johnny’s Toys in Latonia and Green Hills had(the Green Hills store closed in 2008) an extensive train department and held a train show each year in the winter months. The show featured modular layouts, clinics and the annual clearance. Bargain hunters crowded around the tables each year ready to scramble for those great deals. This is the one time when we men (and a few women) get to act like the stereo-typical shopper climbing over each other to get to the item. In reality it’s not quite that bad, but you had to be quick to get what you want. I missed the bargains that year, but decided to purchase a copy of Model Railroader to as I said to myself, just see what is happening in the hobby. Before I knew it I was buying cars, then a locomotive and before I knew it, I was building a layout. The Mrs. was not too happy at this point, mainly because I did not share my rekindled passion for model railroading, in other words the volcano was starting to smoke, but it was Pam who was ready to erupt! After some smoothing over and negotiations the railroad was moving along. Of course it does not hurt to have a young son to get the trains for.  The layout was in the garage and I had to move the car out to work on it but I had a railroad started.

In the meantime, I joined the Louisville and Nashville Historical Society and the National Model Railroad Association, was attending conventions and meetings, doing some rail fanning and of course reading as much as I could get my hands on. In some ways, I am obsessive. Once I get involved I dive into the pool head first. Fully drenched I started involving the family in my train activities.

Stay tuned for more…

Locomotive Transport Boxes

_MG_0523

When I got my second steam engine and needed a way to transport it to meets safely, I designed a box. I already had boxes for my electric locos. Those boxes required the the locos to be placed in the box and then foam placed on both sides.

Given the box was for a live steam engine, I was concerned about the oil residue and placing a warm loco in a box with foam; that lead me to design a box that held the loco in place with small bungee cords. Eyelets are attached to the bottom for the bungees. The loco is placed on the bottom which has two groove cut at 45mm or track gauge.  The rest of the box is the “top” that attaches to the bottom using a tight seal sash lock. A one inch wide safety strap around the box serves as a backup.

8657934
The strap is made of 1″ nylon strapping and a parachute buckle. I purchased both at Joann Fabrics. The strapping is sold by the yard.

20150212_211232
Bungee cords, handle, tight seal sash lock

The bottom of the box is constructed of a 1X8 cut to whatever length required for the locomotive. The rest of the box is constructed of 15/32″ plywood, glued and screwed together. The screw were countersunk and filled. The entire box was sanded and then painted with satin latex paint. The bottom was stained with maple stain/polyurethane. A border was painted with the latex paint.

The latches were attached to the ends and the handle to the top.

sta-80-1700
On the original box I used this draw style latch.

Loco BoxA crude SketchUp drawing.

Dimensions-
Sides 8.46875″H – Length determined by loco.
Top 6.5″W –  Length determined by loco.
Ends 6.5″W 8″H
Bottom – 7.5″W – Length determined by loco.

_MG_0522
My live steam mogul bungeed down to the bottom of the original box. The handle is offset to compensate for the heavier end where the loco is.


New Locomotive – Mich Cal #4 Climax

Update 5-18-15

Success!!! I steamed up the climax on Allan Pantle’s track yesterday and ran it for about 15 minutes. Running much better now. I didn’t run in reverse, but optimistic that will be fine as well. Still…a lot of trouble for a $1800 loco.

Update  4-10-15 – The climax arrived back from Accucraft yesterday. I steamed her up and ran her on rollers. The loco ran fairly well in forward, but at half speed in reverse. After inspection, the drive shaft on the front truck was obviously bent again (probably from screwing the trucks back on). They couldn’t have tested the loco and not noticed. I removed the draft shaft, straightened and then replaced the shaft. I didn’t have time to steam her up again. That will have to wait until I can get out to my track. I’m optimistic that she is ready to go. In Accucraft’s favor, the did replace a bolt that had sheared off on the bottom, but to send it back with a bent drive shaft was inexcusable. Stay tuned…

Update – I sent the trucks back to Accucraft for service. I got them back and tested them on my loco while running on rollers. Seemed to run better so I was hoping it would run well at our upcoming steam up.

She would run well in reverse on the larger radius curves but would bind on the smaller (6.5′ radius) curves. I decided to send the entire loco back to Accucraft for service.

I contacted Cliff at Accucraft and he mailed me a UPS shipping label to return the locomotive. UPS picked it up two days ago.Stay tuned for further updates…

Original post…

20150122_191953

I have wanted a live steam Climax locomotive ever since I saw an Aster Climax years ago. When Accucraft came out with their version, I knew I had to have one; mine finally arrived via UPS. When Accucraft released the two models I set my heart on the straight stack, unlettered model. When it came time to purchase I could not find any for sale in the states and settled on the Mich Cal #4 instead. Now that the model has arrived I am very happy with #4 although there is an issue with the particular locomotive I acquired but more on that later.

The loco arrived in the original packing box containing the usual Accucraft red box. Much nicer than the boxes my mogul arrived in.

20150122_174630

The locomotive came well pack in foam, tape and tissue paper all attached to a piece of plywood.

20150122_175012

After unpacking the model I began to inspect the new loco. I attempted to move the Johnson bar (reversal) unsuccessfully. After applying lubrication to the valve and carefully using a pair of needle nose pliers I was able to free the valve. After working the linkage and valve back and forth, the reverser worked properly. After I oiled around, adding water, steam oil and fuel, I steamed up the loco. While the loco steamed up easily, there was obviously something wrong with the drive train.

Once the loco cooled, I drained the tender and inspected the drive train. Unfortunately, I discovered both drive axles were bent. After some research online, it seems that the trucks are bent when the trucks are attached to the loco at the factory.

20150122_205249

I removed the drive axles and straighten them although I could not get them completely straight and true. I requested drive axles from Accucraft.

On Saturday, January 24th I steamed up #4 at our club (GCGRS) layout at EnterTRAINment Junction and shot a short video.